

Chainable compute. Right on queue. (Sponsored)

Define tasks with Render’s lightweight SDK and chain them into long-running, distributed workflows. Launch your agents and batch jobs on demand. Render Workflows handles queuing, orchestration, and retries.
This week’s system design refresher:
How Docker Works Under the Hood
git merge vs git rebase
12 popular vector databases help you get the right context to the model
Pagination Strategies for Large Systems
How LLMs Use AI Agents with Deep Research
How Docker Works Under the Hood
A Docker container starts with a single command, but that command has to be turned into a running Linux process. Here is what actually happens.
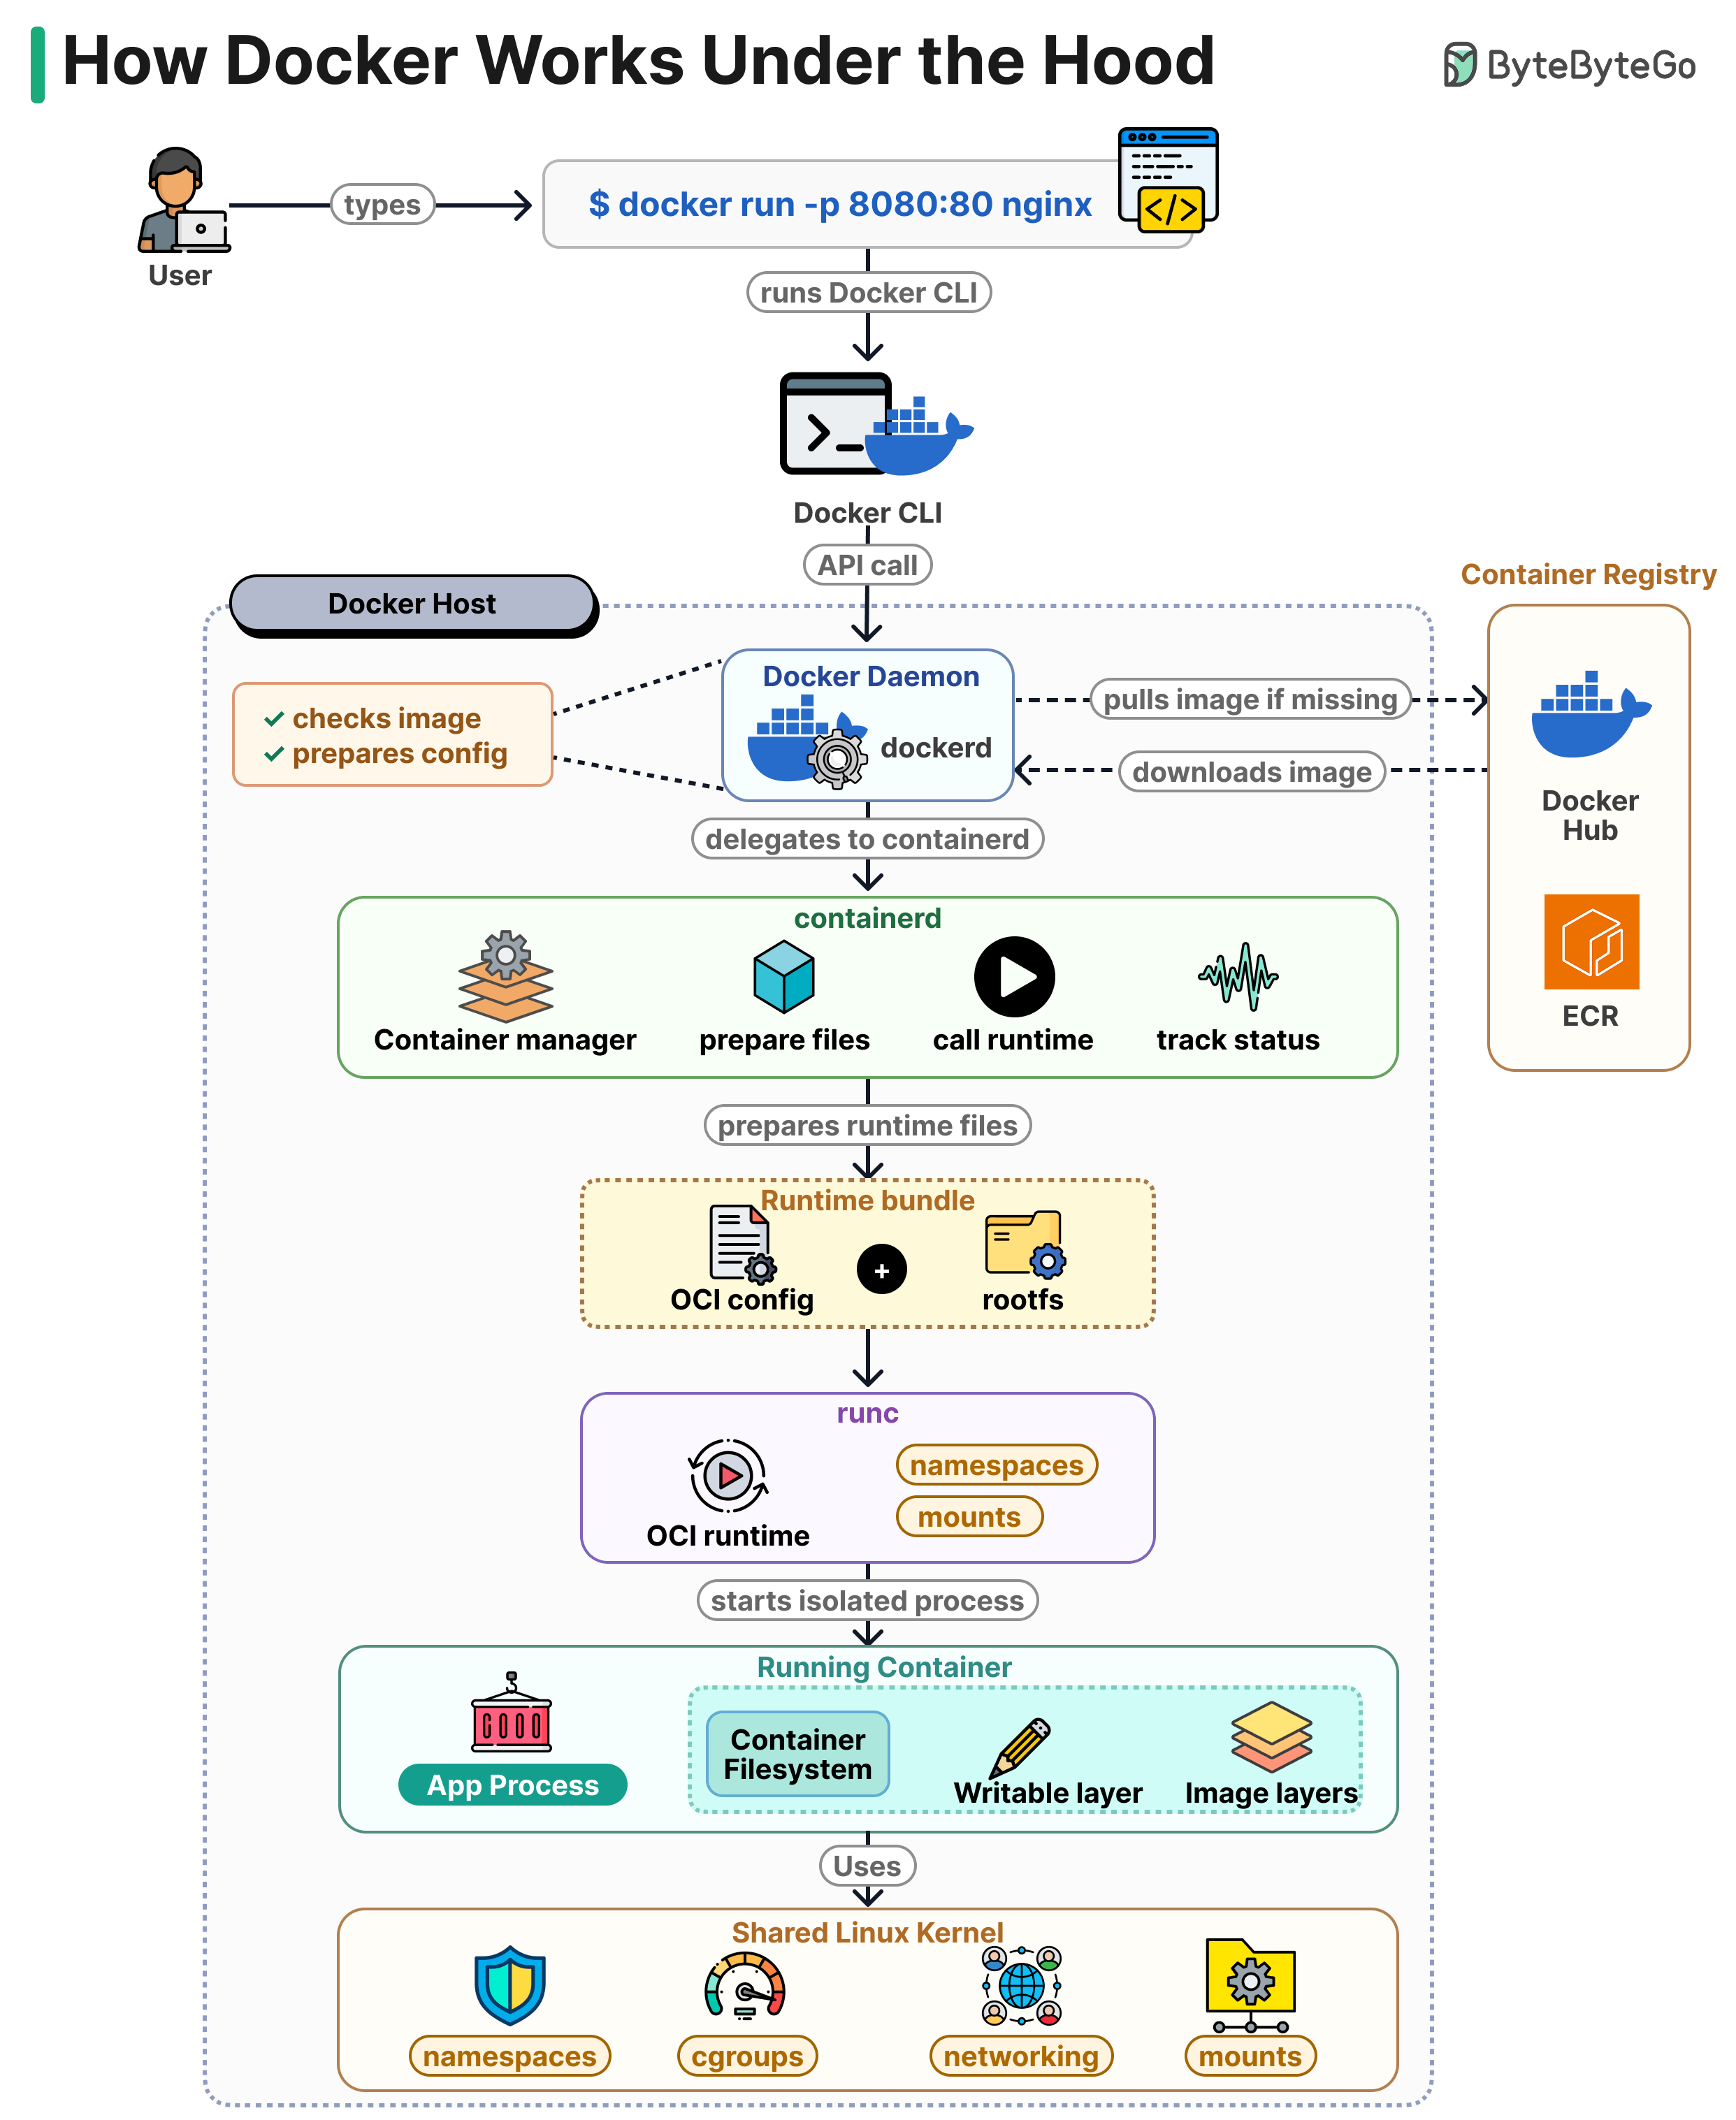
The Docker CLI takes your command and sends it as an API call to the Docker daemon (dockerd) running on the host.
dockerd checks whether the nginx image is already on disk. If it is not, it pulls it from a registry like Docker Hub or ECR. Then it prepares the container config.
dockerd does not start the container directly. It passes the request to containerd, which manages the container lifecycle. containerd prepares the runtime files and assembles a bundle made of the OCI config and the root filesystem.
containerd then calls runc. runc reads the bundle, creates the Linux namespaces and mounts defined in the config, and starts the process inside them. Once the process is running, runc exits.
The running container is a regular Linux process with its own PID, network, and mount namespaces. Its filesystem is a stack of read-only image layers with a writable layer on top, so changes inside the container do not modify the image.
Isolation comes from kernel features. Namespaces separate processes, cgroups limit CPU and memory, and network namespaces give the container its own interfaces. There is no guest OS and no hypervisor.
Over to you: where do most of your container issues show up, the image, networking, or resource limits?
git merge vs git rebase
Both commands get your changes into main. The difference is what they do to history.
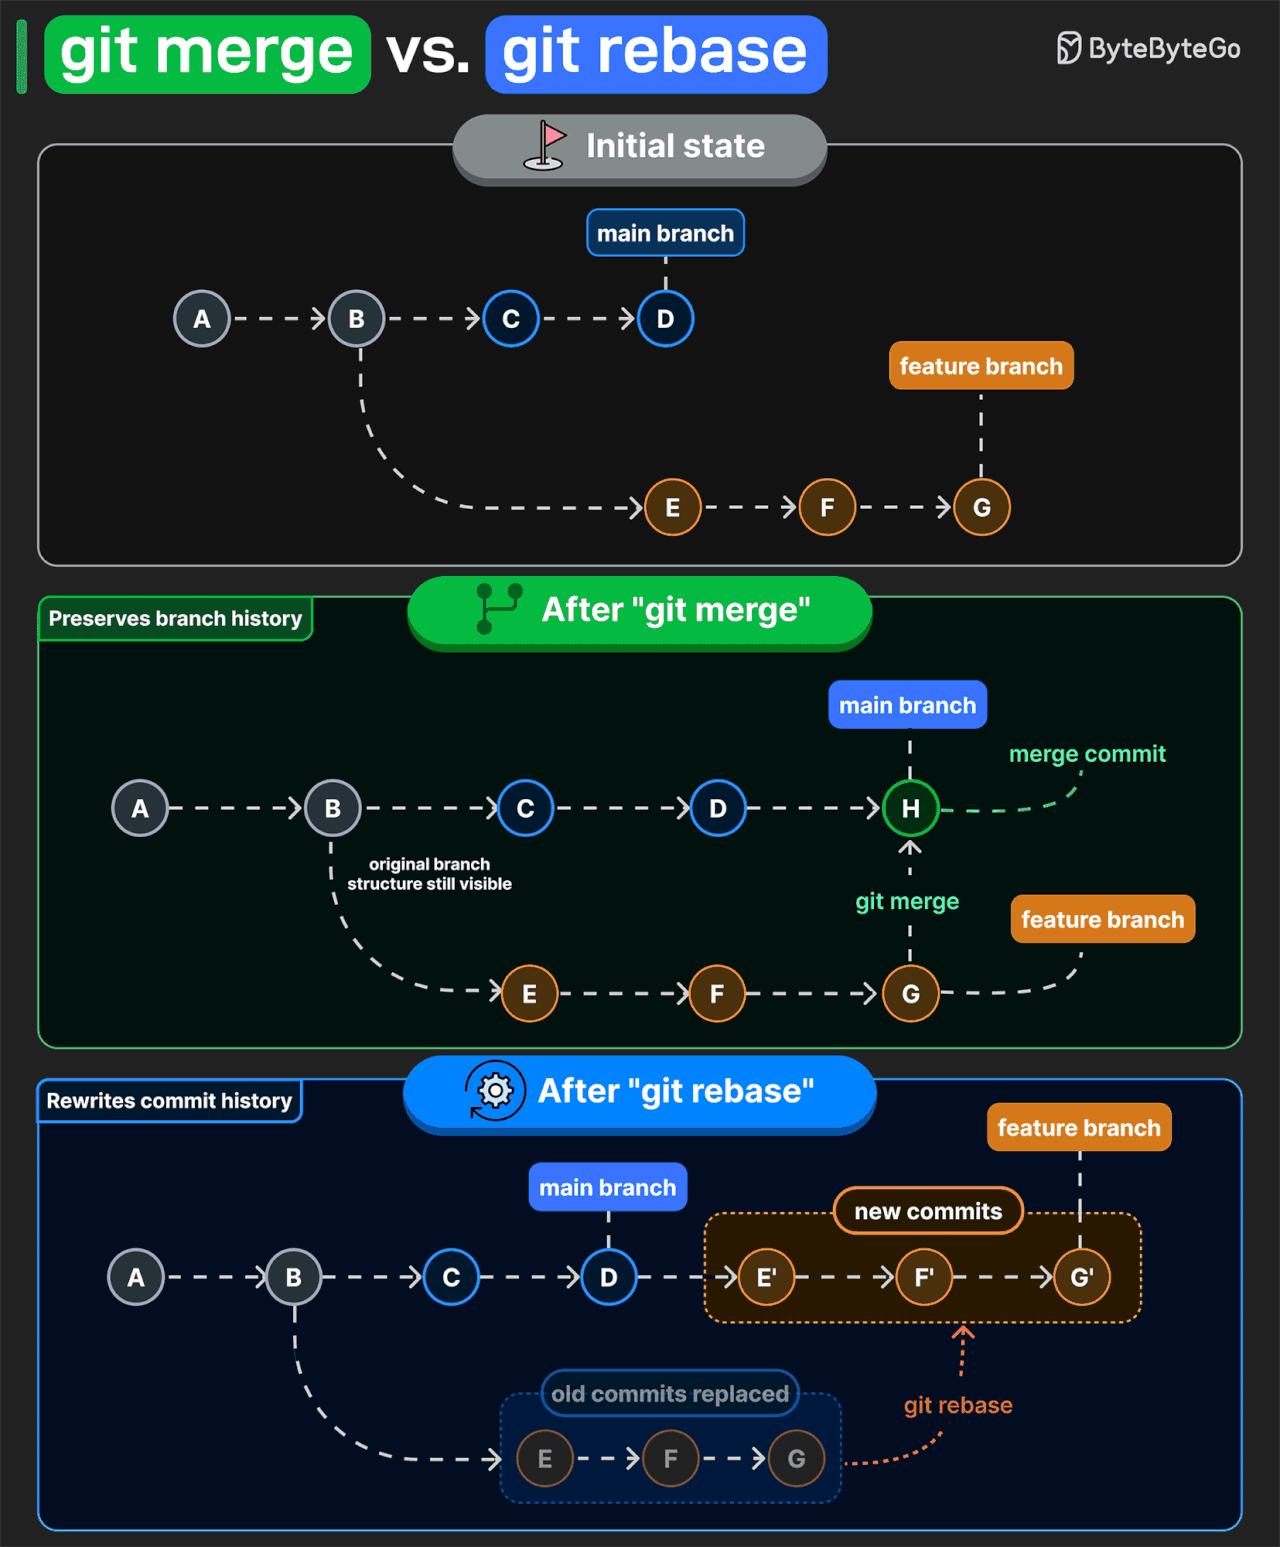
git merge preserves the original branch structure. If main and feature branches have diverged, Git creates a merge commit and keeps both lines of development . That makes it easy to see where work branched off, what got merged, and when it came back together.
git rebase takes a different approach. It reapplies your feature commits onto the latest main branch as new commits. The result is a linear history. But those rebased commits get new IDs, so rebasing a shared branch usually means force-pushing and making others sync to rewritten history.
That is why teams often use merge on shared branches. It keeps existing commit IDs unchanged, so everyone can pull without dealing with conflicts. Rebase is more useful for cleaning up your own branch before you merge it.
Over to you: which command do you prefer?
12 popular vector databases help you get the right context to the model
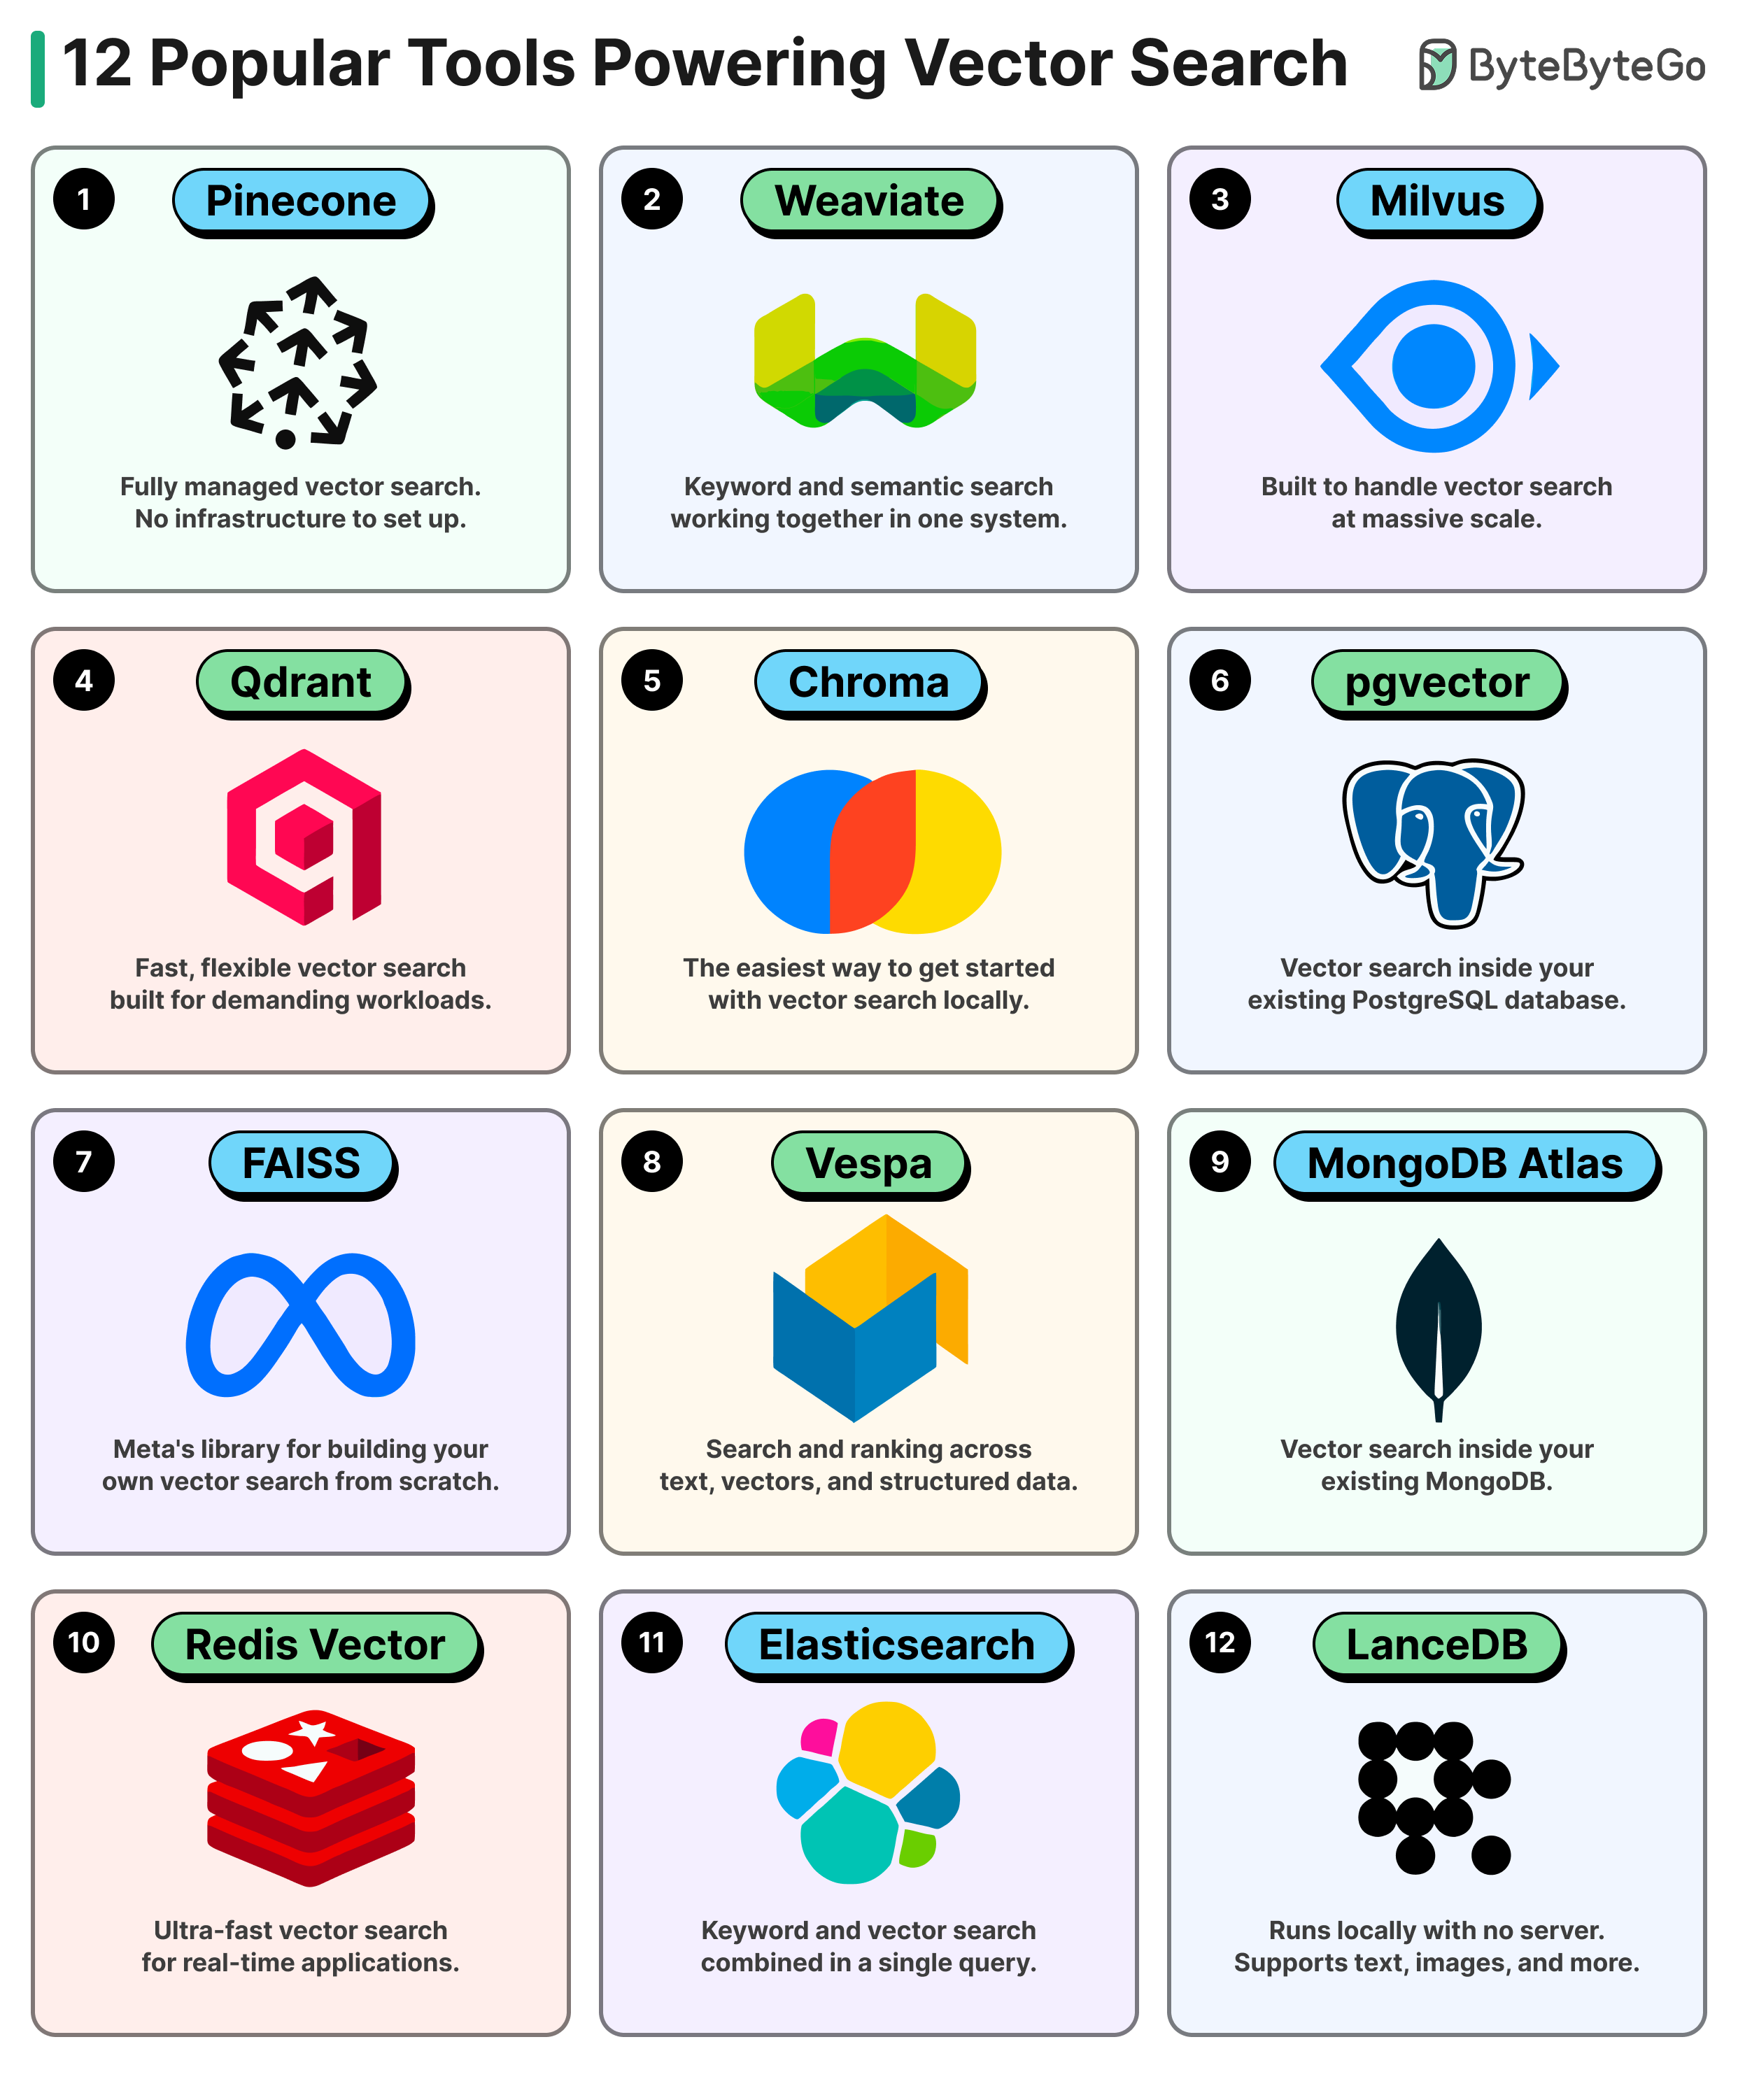
Pinecone: Fully managed, serverless with hybrid search (dense + sparse) native. Best when your team wants zero infrastructure overhead.
Weaviate: Built-in vectorization and native BM25 + vector hybrid search. Best when you need keyword and semantic search in one system.
Milvus: Distributed vector database with horizontal scaling and GPU acceleration support. Best for massive-scale workloads.
Qdrant: Rust-based vector search engine with dense, sparse, and metadata filtering built for production-grade retrieval. Best when control over ranking and latency matters.
Chroma: Embedded vector database that runs directly inside Python applications. Best for local RAG prototypes and experimentation.
Pgvector: Postgres extension that adds vector search using SQL. Supports HNSW and IVF indexes. Best if you're already running PostgreSQL.
FAISS: Meta's ANN library for vector similarity search. GPU accelerated and highly customizable. Best for custom retrieval systems.
Vespa: Combines dense vectors, sparse retrieval, and structured data in one engine. Best for large-scale search and ranking systems.
MongoDB Atlas Vector Search: Vector search integrated directly into MongoDB collections. Best if your application already uses MongoDB.
Redis Vector: Low-latency vector search alongside caching, pub/sub, and streaming. Best for real-time AI applications and semantic caching.
Elasticsearch: Combines BM25 and vector search in a single query engine. Best if you're already running Elastic for search and analytics.
LanceDB: Runs in-process, zero-copy disk reads, no server to manage. Native multimodal support. Best for local-first AI, edge deployments, and data lake workloads.
The right choice depends on your use case and in production, it's common to use more than one. Which of these tools are you using in production?
Pagination Strategies for Large Systems
Pagination looks simple when your table has a few thousand rows. It becomes a real problem once your data grows.
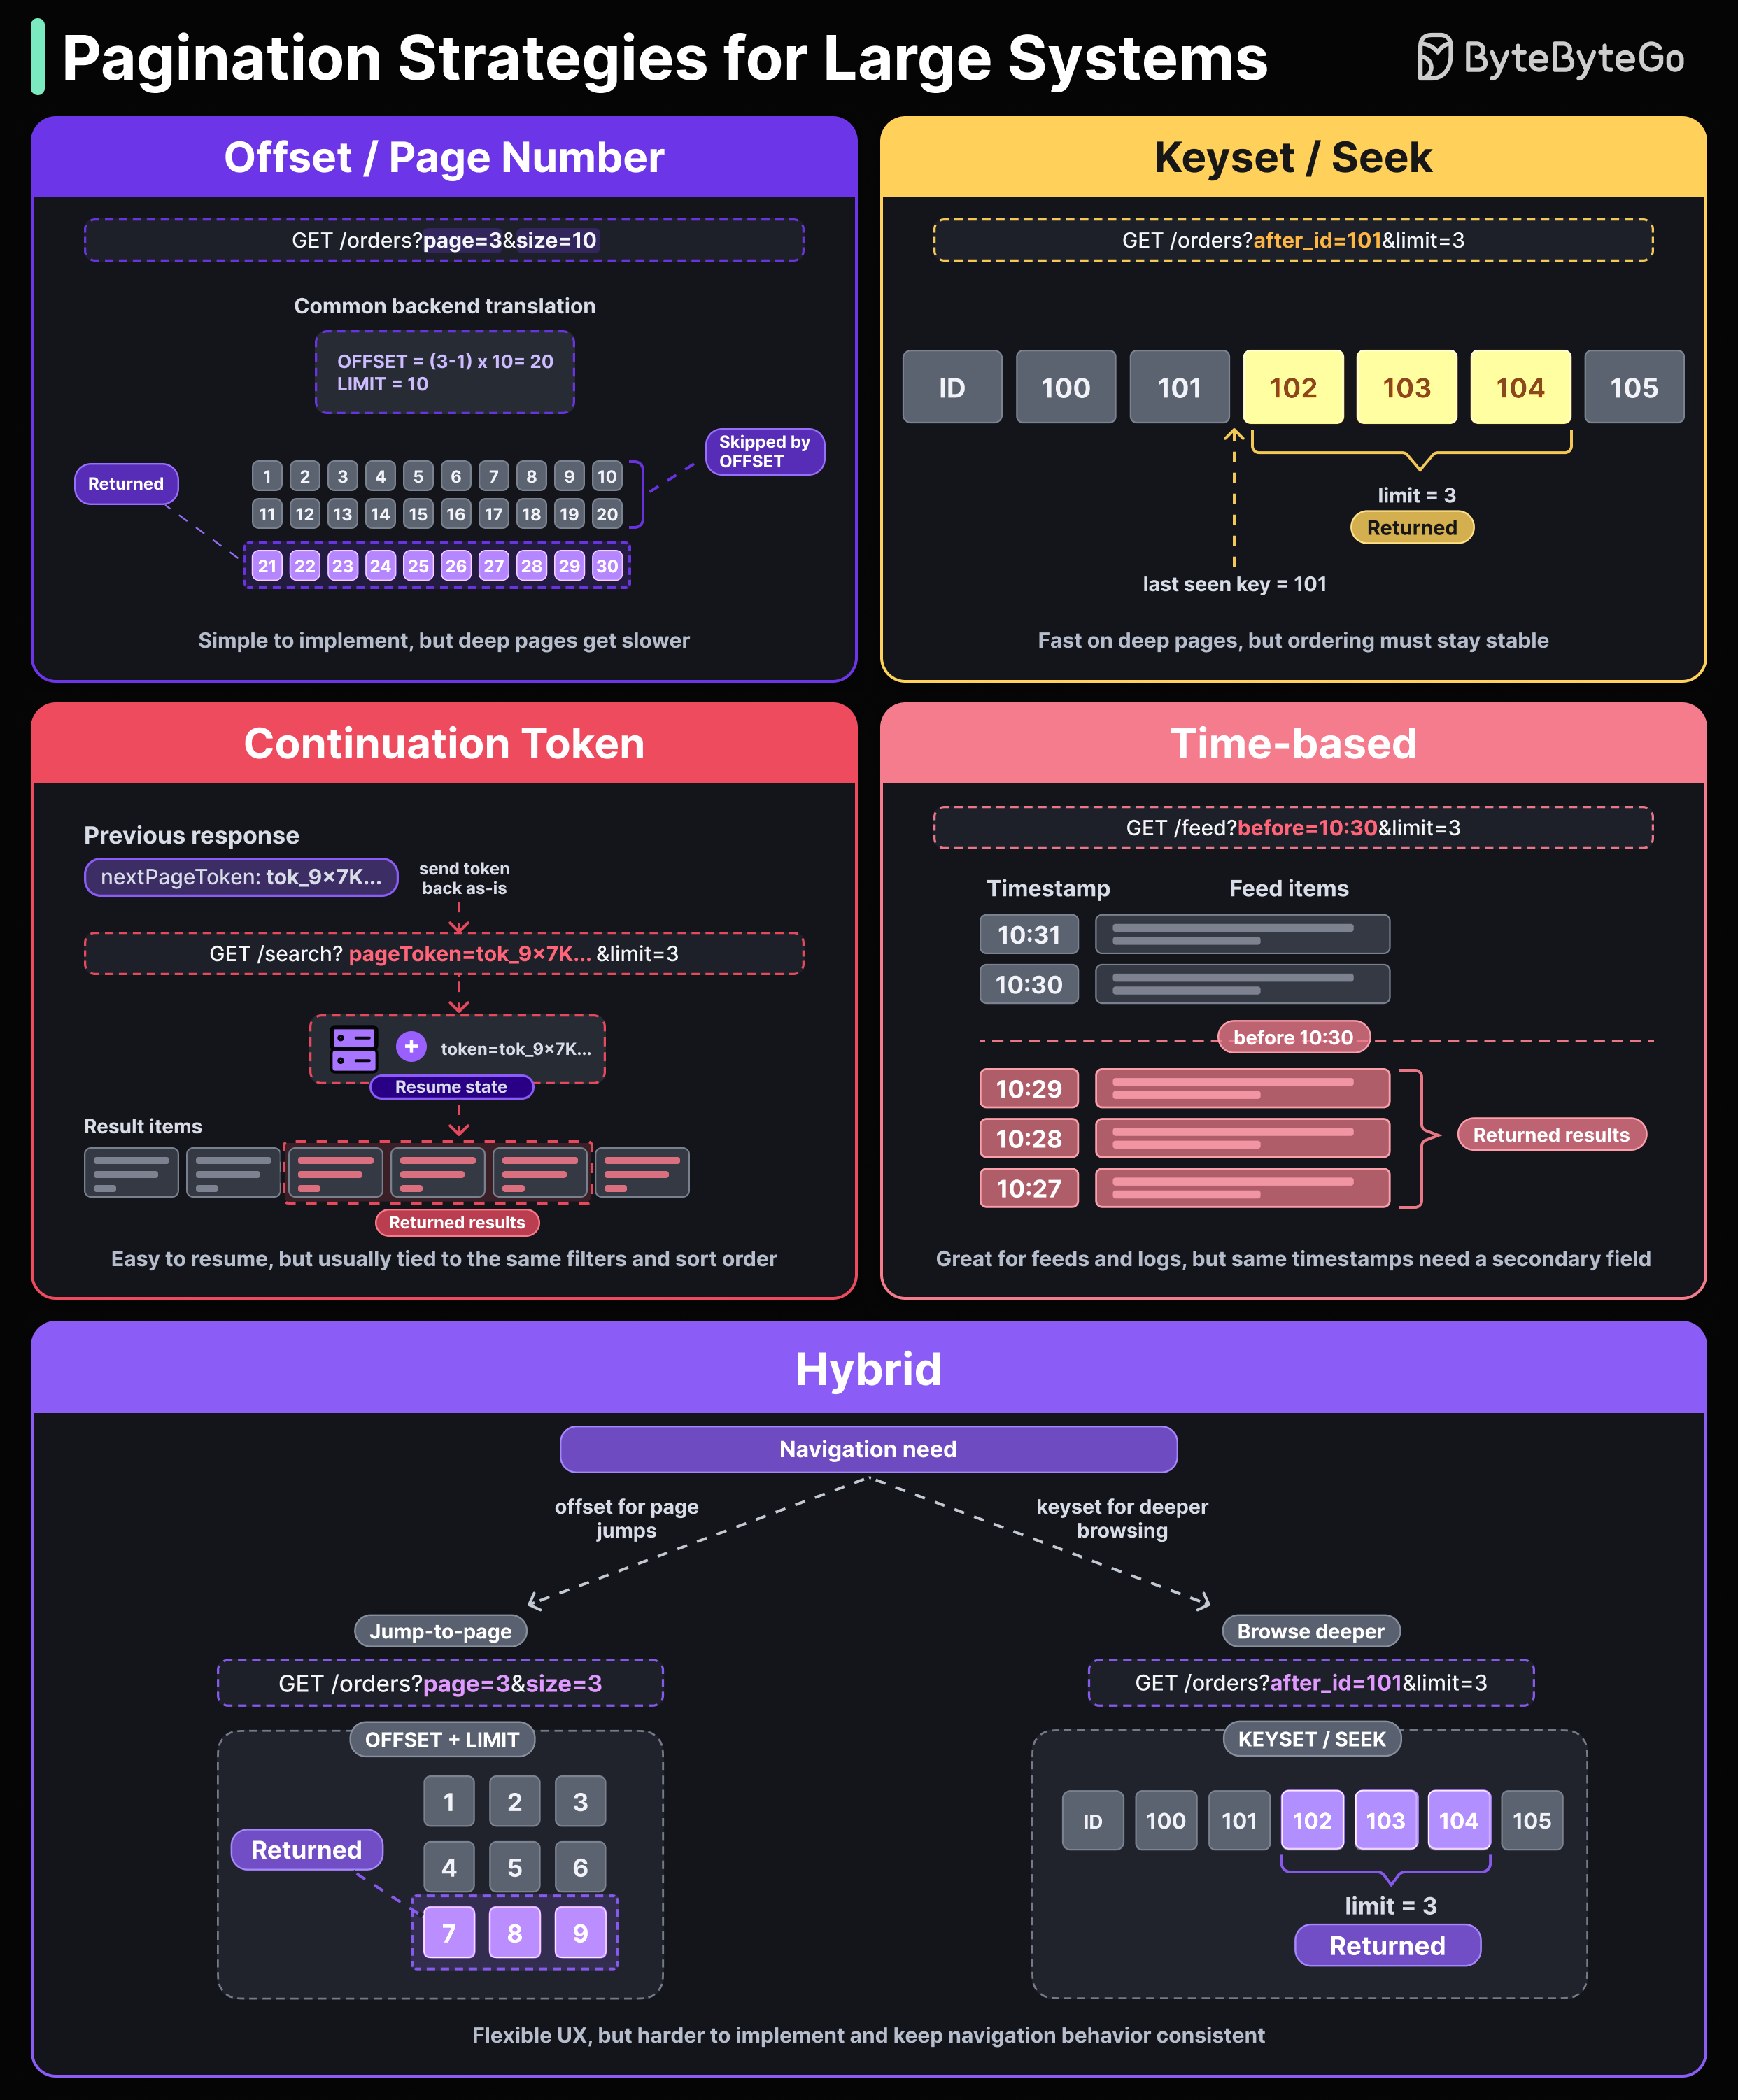
Here is how the main approaches compare when the dataset is large.
Most pagination implementations start with offset and page numbers. You ask for “?page=3&size=10” and the database skips 20 rows, then returns 10. Simple to build and easy to explain. The issue is that the database still reads every row it skips. Page 5 is fast. Page 5000 is slow.
Keyset pagination handles deep pages much better. Instead of counting rows, you tell the server to return items after ID 101. The query goes straight to that point using the index, so page 1 and page 10,000 take the same time.
Continuation tokens are common in large APIs like S3 and YouTube. The server returns a token, you send it back on the next request, and it resumes from where the last response ended. It hides the cursor logic from the client. The token is tied to the filters and sort order from the original request, so the client must keep using the same parameters until the pagination ends.
Time-based pagination works well for feeds and logs. You ask for items before a timestamp and read backwards. Add a secondary field, like an ID, for rows that share the same timestamp. Without it, you can lose records.
Over to you: Which one have you used?
How LLMs Use AI Agents with Deep Research
When you ask an LLM such as Claude, ChatGPT, or Gemini to do deep research on a complex topic, it’s not just one model doing all the work. It’s a coordinated system of specialized AI agents.
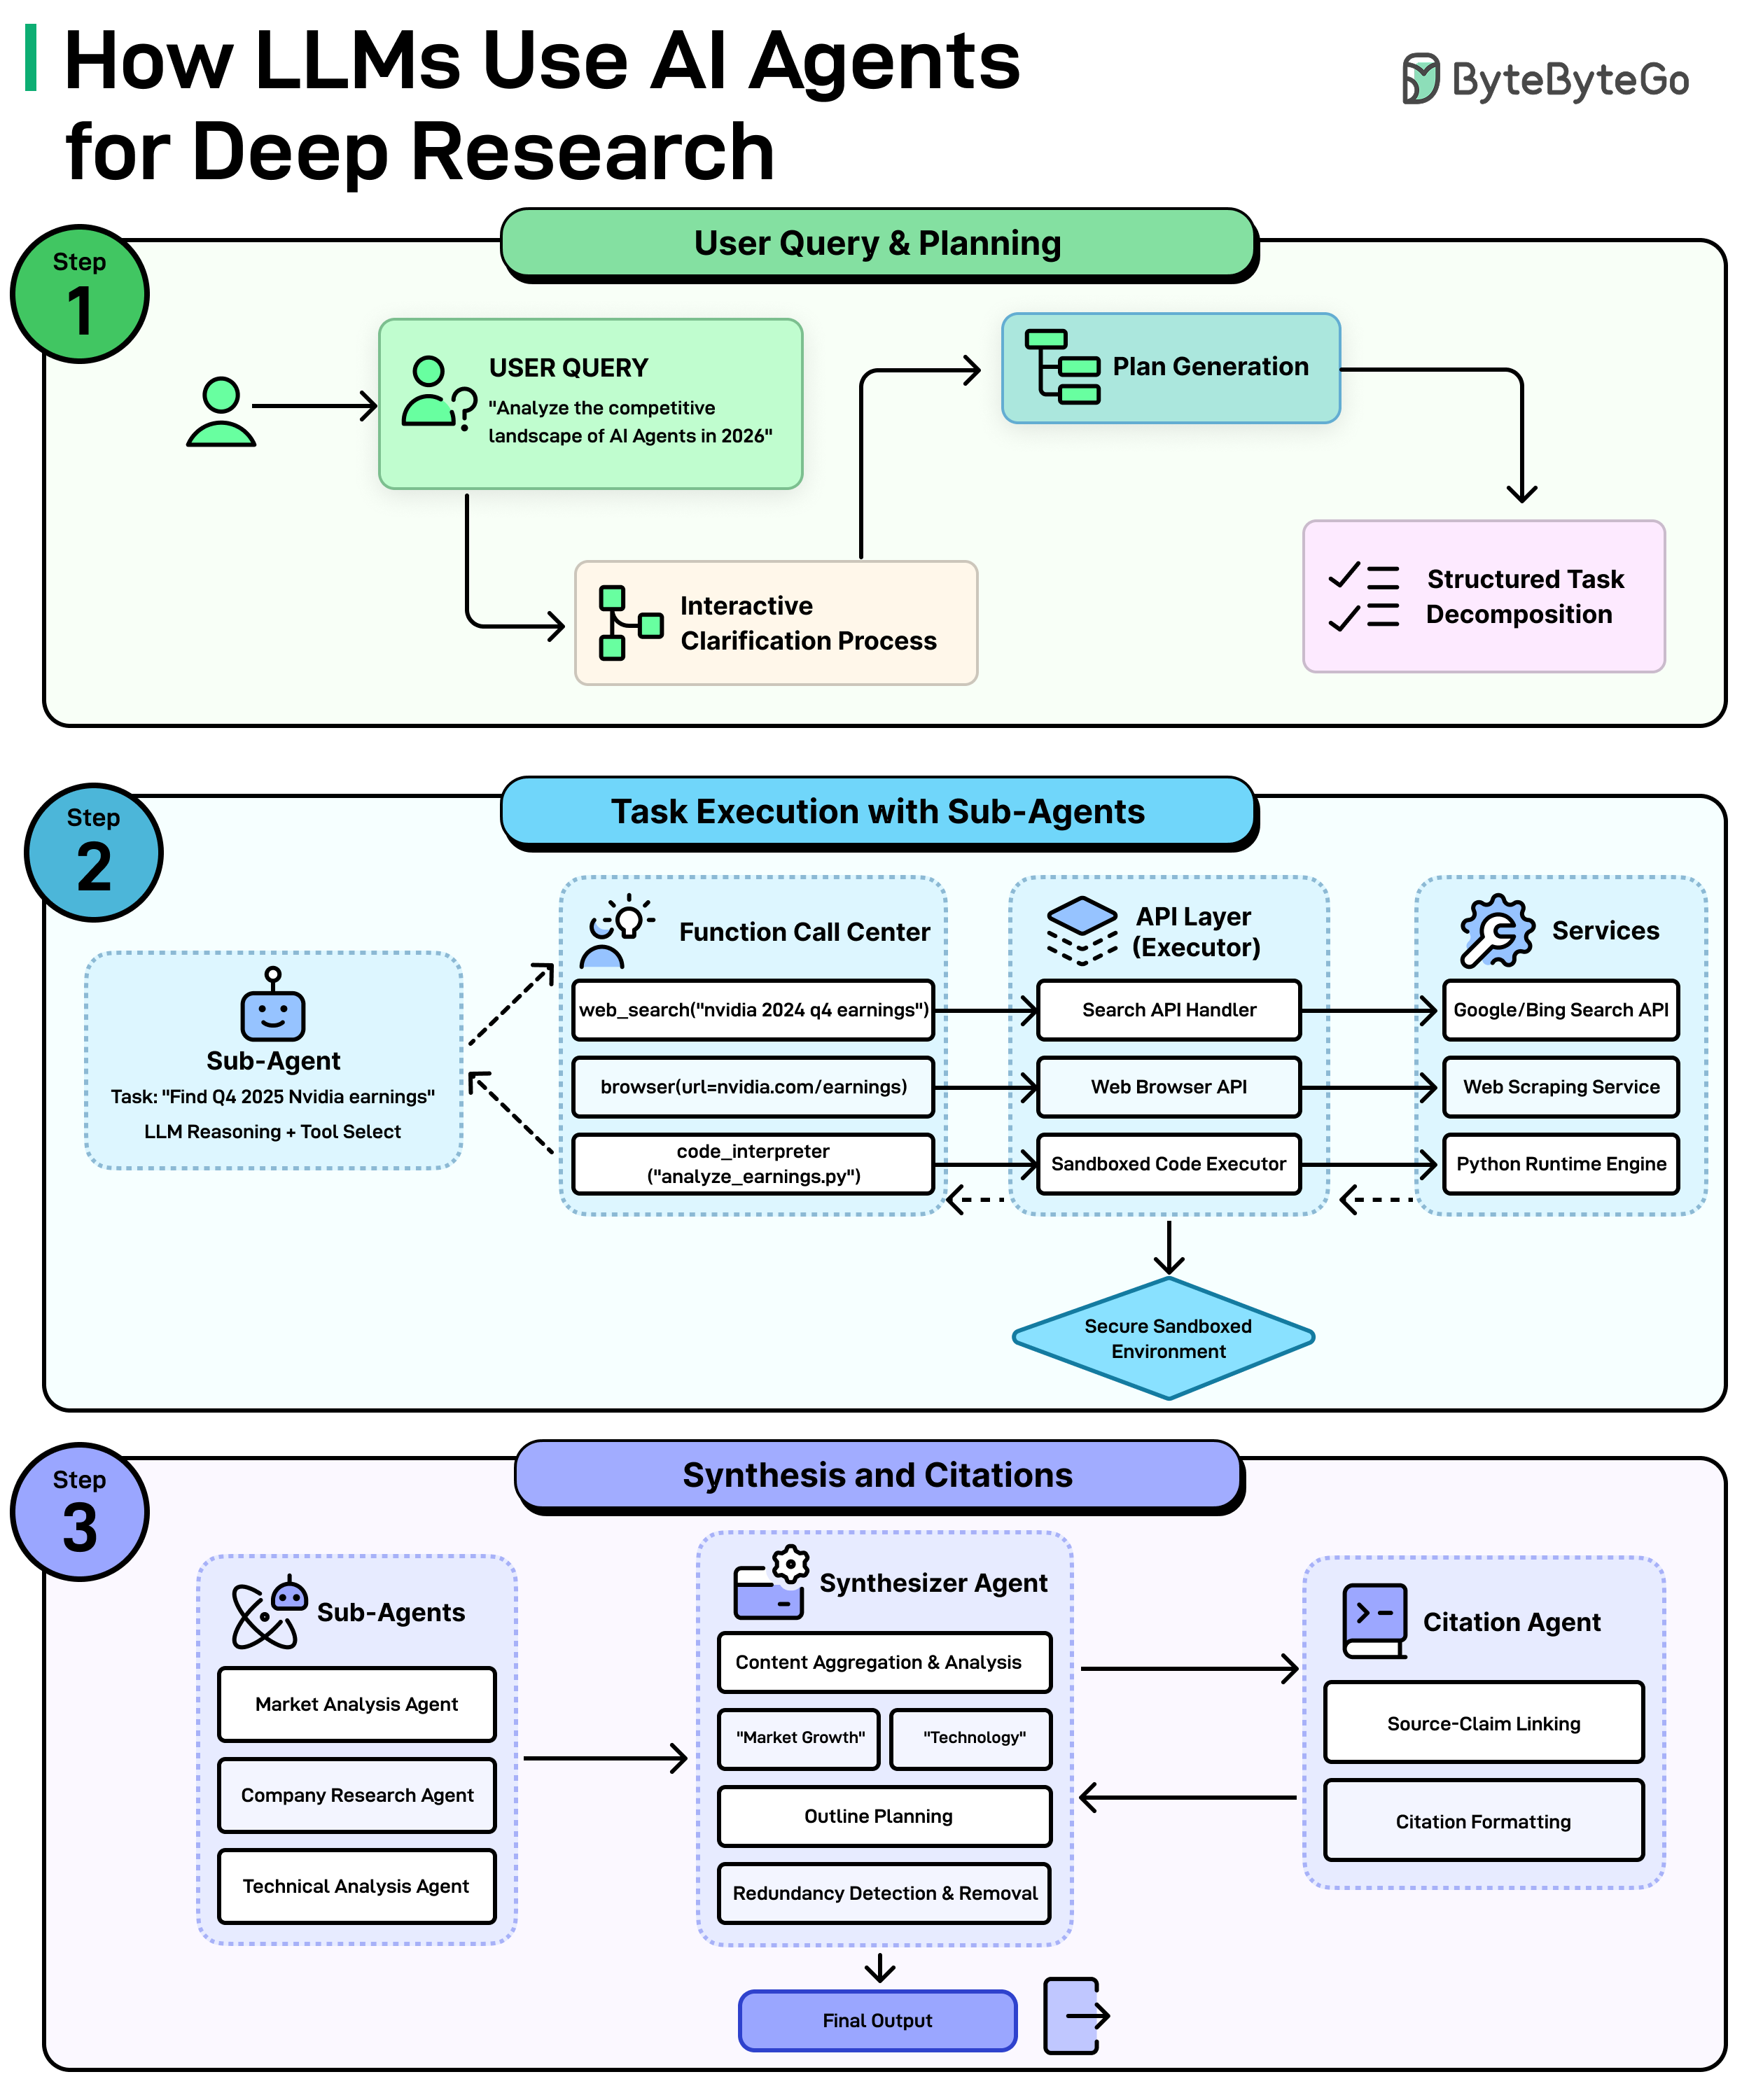
Here’s how it works:
Step 1: Understanding The Question and Making a Plan
It all starts with the query, something like “Analyze the competitive landscape of AI agents in 2026. The system doesn’t just dive in blindly. First, it may ask clarifying questions to understand exactly what is needed. Then, it generates a plan and breaks the big question down into smaller and manageable tasks.
Step 2: Sub-Agents Get to Work
Each small task gets assigned to a sub-agent, which is basically a mini AI worker with a specific job. For example, one sub-agent might be tasked with finding the latest Nvidia earnings. It figures out which tools to use, such as searching the web, browsing a specific page, or even run code to analyze data. All of this happens through a secure layer of APIs and services that connect the AI to the outside world.
Step 3: Putting it All Together
Once all the sub-agents finish their tasks, a Synthesizer Agent takes over. It aggregates everything, identifies key themes, plans an outline, and removes any redundant or duplicate information. At the same time, a Citation Agent makes sure every claim is linked back to its source and properly formatted. The end result is a polished, well-cited final output ready for use.
Over to you: Have you tried deep research in any LLM?
Good one 👍
Good visual on the daemon/containerd split. Worth calling out too that most of what people call Docker overhead is actually the image pull and layer caching, not the runtime itself once the container is actually running.